Magnetic Particle Inspection of Pipe Fittings with Anti-corrosion Coatings
Posted: 01/16/2023 09:09:57 Hits: 10
Abstract: The magnetic particle inspection for pipes and pipe fittings with various specifications and anti-corrosion coatings with different thicknesses is introduced in the construction of coal chemical engineering projects. In a methanol-to-olefins project, there are magnetic pipes and pipe fittings with anti-corrosion coatings of different thicknesses; according to the project construction acceptance specifications, magnetic steel pipes and pipe fittings must be inspected by magnetic particle inspection in proportion. If the magnetic particle inspection is carried out without removing the coating, when the thickness of the coating is greater than 50um, the standard does not support it. If the anti-corrosion coating is removed for magnetic particle inspection, it is quite difficult to remove the coating. The cost is high, and the effect is not good. For this reason, experimental research is carried out to solve the problems of magnetic particle inspection of magnetic pipes, pipe fittings with different anti-corrosion coatings.
1. Inspection regulations
The specification for acceptance of construction quality of metal pipeline engineering in the petrochemical industry (GB 50517—2010) stipulates the inspection of pipes and pipe fittings as follows:
5.1.9 Grinding is allowed for surface defects of pipes and pipe fittings found by magnetic particle testing or penetrant testing, and the actual wall thickness after grinding shall not be less than 90% of the nominal wall thickness of the pipe, and shall not be less than the negative deviation specified in the design documents.
5.2.6 For pipes that are extremely hazardous and whose design pressure is greater than or equal to 10MPa, when the outer diameter is greater than 15mm, the outer surface of the pipe shall be subjected to a confirmatory inspection. Magnetic particle testing shall be applied to magnetic-conductive steel pipes, and penetration testing shall be applied to non-magnetic-conductive steel pipes. The sampling number should be 5% of each batch and not less than one piece, and the test results should meet the current national standard JB/T4730.4 "Nondestructive Testing of Pressure Equipment Part 4: Magnetic Particle Testing" level I, JB/T4730.5 " Non-destructive testing of pressure equipment Part 5: Penetration testing" level I.
2. Magnetic particle inspection steps
2.1 Surface preparation
There must be no grease, rust, scale or other substances adhering to magnetic powder on the surface of pipes and pipe fittings. The irregular state of the surface shall not affect the correctness and integrity of the test results; if there is a coating on the surface, when the uniform thickness of the coating does not exceed 0.05mm and does not affect the test results. If it does not affect the test results, the magnetic particle test can be carried out with coating based on the agreement of all parties.
2.2 Measuring the thickness of the anti-corrosion paint layer
Measure anti-corrosion coatings on selected pipes and pipe fittings for magnetic particle inspection.

Figure 1 Measuring the thickness of anti-corrosion coatings
2.3 Checking the sensitivity of the system
According to JB/T 4730.4-2005 "Nondestructive Testing of Pressure Equipment" Article 3.8.5.2,the magnetized yoke method is used to magnetize the workpiece, and the system sensitivity is verified according to the actual measurement results of the standard test piece. Put the test piece without artificial defects outward for testing sensitivity (A1——15/100). To make the test piece in good contact with the surface to be tested, it can be pasted on the surface to be tested with transparent tape, and the tape should not cover the artificial defects on the test piece (Figure 2).

Figure 2 Checking the sensitivity of the system
2.4 Standardized operation for magnetic particle inspection
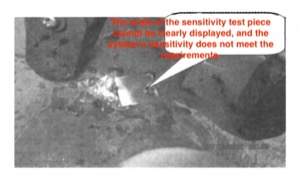
(1) When the notch of the sensitivity test piece can be displayed, it means that the sensitivity of the magnetic particle inspection system meets the standard requirements, otherwise it does not meet the requirements (Figure 3).

Figure 3 The system sensitivity does not meet the requirements.
(2) Under the premise that the grooves of the magnetic particle inspection sensitivity test piece can show that the system sensitivity meets the standard requirements; use the magnetic yoke method to conduct magnetic particle inspection on the surface of the pipe and pipe fittings.
(3) To enhance the comparison, a contrast enhancer is used.
(4) The continuous method of magnetizing pipes and pipe fittings, the process of applying magnetic powder and the observation of magnetic marks should be carried out within the magnetization energization time. The energization time is 1 to 3 seconds, and the magnetization can be stopped after stopping the magnetic suspension for at least 1 second. To ensure the magnetization effect, the magnetization should be repeated at least twice.
1. Inspection regulations
The specification for acceptance of construction quality of metal pipeline engineering in the petrochemical industry (GB 50517—2010) stipulates the inspection of pipes and pipe fittings as follows:
5.1.9 Grinding is allowed for surface defects of pipes and pipe fittings found by magnetic particle testing or penetrant testing, and the actual wall thickness after grinding shall not be less than 90% of the nominal wall thickness of the pipe, and shall not be less than the negative deviation specified in the design documents.
5.2.6 For pipes that are extremely hazardous and whose design pressure is greater than or equal to 10MPa, when the outer diameter is greater than 15mm, the outer surface of the pipe shall be subjected to a confirmatory inspection. Magnetic particle testing shall be applied to magnetic-conductive steel pipes, and penetration testing shall be applied to non-magnetic-conductive steel pipes. The sampling number should be 5% of each batch and not less than one piece, and the test results should meet the current national standard JB/T4730.4 "Nondestructive Testing of Pressure Equipment Part 4: Magnetic Particle Testing" level I, JB/T4730.5 " Non-destructive testing of pressure equipment Part 5: Penetration testing" level I.
2. Magnetic particle inspection steps
2.1 Surface preparation
There must be no grease, rust, scale or other substances adhering to magnetic powder on the surface of pipes and pipe fittings. The irregular state of the surface shall not affect the correctness and integrity of the test results; if there is a coating on the surface, when the uniform thickness of the coating does not exceed 0.05mm and does not affect the test results. If it does not affect the test results, the magnetic particle test can be carried out with coating based on the agreement of all parties.
2.2 Measuring the thickness of the anti-corrosion paint layer
Measure anti-corrosion coatings on selected pipes and pipe fittings for magnetic particle inspection.

Figure 1 Measuring the thickness of anti-corrosion coatings
2.3 Checking the sensitivity of the system
According to JB/T 4730.4-2005 "Nondestructive Testing of Pressure Equipment" Article 3.8.5.2,the magnetized yoke method is used to magnetize the workpiece, and the system sensitivity is verified according to the actual measurement results of the standard test piece. Put the test piece without artificial defects outward for testing sensitivity (A1——15/100). To make the test piece in good contact with the surface to be tested, it can be pasted on the surface to be tested with transparent tape, and the tape should not cover the artificial defects on the test piece (Figure 2).

Figure 2 Checking the sensitivity of the system
2.4 Standardized operation for magnetic particle inspection
(1) When the notch of the sensitivity test piece can be displayed, it means that the sensitivity of the magnetic particle inspection system meets the standard requirements, otherwise it does not meet the requirements (Figure 3).

Figure 3 The system sensitivity does not meet the requirements.
(2) Under the premise that the grooves of the magnetic particle inspection sensitivity test piece can show that the system sensitivity meets the standard requirements; use the magnetic yoke method to conduct magnetic particle inspection on the surface of the pipe and pipe fittings.
(3) To enhance the comparison, a contrast enhancer is used.
(4) The continuous method of magnetizing pipes and pipe fittings, the process of applying magnetic powder and the observation of magnetic marks should be carried out within the magnetization energization time. The energization time is 1 to 3 seconds, and the magnetization can be stopped after stopping the magnetic suspension for at least 1 second. To ensure the magnetization effect, the magnetization should be repeated at least twice.
Post URL: https://www.landeepipefitting.com/magnetic-particle-inspection-of-pipe-fittings-with-anti-corrosion-coatings.html
Landee is a professional industrial pipe fitting manufacturer and be well accepted by customers all over the world, we has been producing Pipe Fitting for a variety of applications since 1985. welcome to access our website: https://www.landeepipefitting.com.
Previous: Materials for Tees Used for China-Russia East Pipelines
Next: Designing Tees on the China-Russian Eastern Pipeline
Next: Designing Tees on the China-Russian Eastern Pipeline
