The Analysis of Cracks in High-pressure Bends
Posted: 06/25/2021 11:32:14 Hits: 89
A high-pressure bend is a kind of pipe fitting used at the turning of the high-pressure pipeline. Among all the pipe fittings used in the high-pressure system, the proportion of a high-pressure bend is the largest, about 80%. Its quality including mechanical properties and dimensional limit deviations directly affect the safety and reliability of the pipeline and the economic benefits of the investor. If the pipeline bursts due to poor reliability, the resulting loss of lives and properties as well as social impact are difficult to estimate.
1. The structure type of high pressure bends
There are generally three kinds of bends: 45° bends, 90° bends and 180° bends, as shown in Figure 1-1.

Figure 1-1 The structure type of high-pressure bends
1.2 Defect characteristics of high-pressure bends
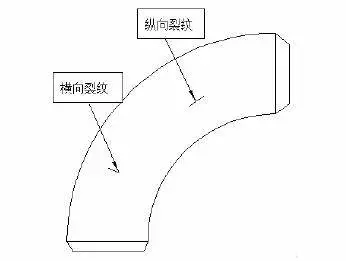
Various defects often occur for high pressure bends due to the processing, material, heat treatment and the existing defects of the raw material itself, most of which are cracks, strains, double skin, slag inclusion, delamination and partial deep pits. The inspection results of a number of bends on site show that most defects of the bend are cracks. One is the longitudinal crack parallel to the pipe axis; the other is the transverse crack perpendicular to the pipe axis, as shown in Figure 1-2.

Figure 1-2 Two main cracks of bends
1.3 The force analysis of cracked high-pressure bends on site
The stress of a non-defective bend of equal thickness under internal pressure is obtained from the film theory:


In this formula:
P stands for the internal pressure of the high pressure bend (MPa).
R means the radius of curvature of the high pressure bend (mm).
T is the wall thickness of high pressure bends (mm).
σφ means the circumferential stress on the high pressure bend (MPa).
σφ is the longitudinal stress of the high pressure bend (MPa).
The circumferential stress distribution is shown in Figure 1-3:

Figure 1-3 The circumferential stress distribution of bends
The circumferential stress at the inner arch:

The circumferential stress at the outer arch:

The circumferential stress at the geometric centerline:

It can be seen from the formula 2-2 that the longitudinal stress of the bend is the same as that of the straight pipe, and it has nothing to do with the curvature of the bend. However, the circumferential stress is quite different from that of a straight pipe. It can be seen from formula 2-1 that the curvature, position angle and internal pressure of the bend will affect its size. It can be seen that the circumferential stress at the inner arch is the greatest by comparing equations 2-3 and 2-4, while the circumferential stress at the outer arch is the smallest. As the radius of curvature of the head increases, the circumferential stress at the inner arch decreases, and the circumferential stress at the outer arch increases. The circumferential stress of the geometric centerline is the same as that of the straight pipe.
1.4.1 Mechanical performance requirements for raw materials for high pressure bends
Because the mechanical properties and metallographic structure of the steel plate used to make the bend or steel pipe directly affect the mechanical properties and metallographic structure of the bend, further affecting the safety and reliability of the bend. Therefore, there are some requirements for raw materials used to manufacture bends at home and abroad. In contrast, the requirements for domestic standards are relatively low. There are only low requirements for the raw material of the bend specified in Q/SY GJX111-2009. The bend is made of the straight pipe through the intermediate frequency electric induction heating bending process. High temperature bending will inevitably cause changes in the mechanical properties, metallographic structure and hardness of the straight pipe, and these changes will have an adverse effect on the safety of the bend. If the mechanical properties and metallographic structure of the raw material of the bend are not good, then the mechanical properties and metallographic structure of the bend manufactured may be worse. Such bends are prone to various defects during use. Once an accident occurs, the losses caused are certainly irreparable, which has been confirmed by certain engineering practices. When high-pressure bends are manufactured, not only should the mechanical properties of raw materials of steel pipes and steel plates meet the requirements for the bend, but also consider that whether or not the mechanical properties of the bend can meet the design requirements.
1.4.2 Mechanical properties of high pressure bends
The wall thickness of a high pressure bend is determined by its mechanical properties. The mechanical properties not only determine the wall thickness, but also directly affect its safety and reliability and other indicators. If only the safety and reliability of the bend are considered, the mechanical performance of the bend is more important than its limit deviation of sizes. Q/SY GJX111-2009 clearly stipulates the mechanical properties of bends, including yield strength, tensile strength, yield ratio, elongation, etc. The value of yield strength of bends must not be lower than the lowest value of steel pipes. Minimum tensile strength and elongation are not lower than the value specified in the specification according to different steel grades. There are also specifications for the impact toughness test. Ensure that the mechanical properties of bends must be met, that is, the mechanical properties of bends and steel pipes used as raw materials must meet the requirements specified in the standards of steel pipes.

Figure 1-1 The structure type of high-pressure bends
1.2 Defect characteristics of high-pressure bends
Various defects often occur for high pressure bends due to the processing, material, heat treatment and the existing defects of the raw material itself, most of which are cracks, strains, double skin, slag inclusion, delamination and partial deep pits. The inspection results of a number of bends on site show that most defects of the bend are cracks. One is the longitudinal crack parallel to the pipe axis; the other is the transverse crack perpendicular to the pipe axis, as shown in Figure 1-2.

Figure 1-2 Two main cracks of bends
1.3 The force analysis of cracked high-pressure bends on site
The stress of a non-defective bend of equal thickness under internal pressure is obtained from the film theory:


In this formula:
P stands for the internal pressure of the high pressure bend (MPa).
R means the radius of curvature of the high pressure bend (mm).
T is the wall thickness of high pressure bends (mm).
σφ means the circumferential stress on the high pressure bend (MPa).
σφ is the longitudinal stress of the high pressure bend (MPa).
The circumferential stress distribution is shown in Figure 1-3:

Figure 1-3 The circumferential stress distribution of bends
The circumferential stress at the inner arch:

The circumferential stress at the outer arch:

The circumferential stress at the geometric centerline:

It can be seen from the formula 2-2 that the longitudinal stress of the bend is the same as that of the straight pipe, and it has nothing to do with the curvature of the bend. However, the circumferential stress is quite different from that of a straight pipe. It can be seen from formula 2-1 that the curvature, position angle and internal pressure of the bend will affect its size. It can be seen that the circumferential stress at the inner arch is the greatest by comparing equations 2-3 and 2-4, while the circumferential stress at the outer arch is the smallest. As the radius of curvature of the head increases, the circumferential stress at the inner arch decreases, and the circumferential stress at the outer arch increases. The circumferential stress of the geometric centerline is the same as that of the straight pipe.
1.4.1 Mechanical performance requirements for raw materials for high pressure bends
Because the mechanical properties and metallographic structure of the steel plate used to make the bend or steel pipe directly affect the mechanical properties and metallographic structure of the bend, further affecting the safety and reliability of the bend. Therefore, there are some requirements for raw materials used to manufacture bends at home and abroad. In contrast, the requirements for domestic standards are relatively low. There are only low requirements for the raw material of the bend specified in Q/SY GJX111-2009. The bend is made of the straight pipe through the intermediate frequency electric induction heating bending process. High temperature bending will inevitably cause changes in the mechanical properties, metallographic structure and hardness of the straight pipe, and these changes will have an adverse effect on the safety of the bend. If the mechanical properties and metallographic structure of the raw material of the bend are not good, then the mechanical properties and metallographic structure of the bend manufactured may be worse. Such bends are prone to various defects during use. Once an accident occurs, the losses caused are certainly irreparable, which has been confirmed by certain engineering practices. When high-pressure bends are manufactured, not only should the mechanical properties of raw materials of steel pipes and steel plates meet the requirements for the bend, but also consider that whether or not the mechanical properties of the bend can meet the design requirements.
1.4.2 Mechanical properties of high pressure bends
The wall thickness of a high pressure bend is determined by its mechanical properties. The mechanical properties not only determine the wall thickness, but also directly affect its safety and reliability and other indicators. If only the safety and reliability of the bend are considered, the mechanical performance of the bend is more important than its limit deviation of sizes. Q/SY GJX111-2009 clearly stipulates the mechanical properties of bends, including yield strength, tensile strength, yield ratio, elongation, etc. The value of yield strength of bends must not be lower than the lowest value of steel pipes. Minimum tensile strength and elongation are not lower than the value specified in the specification according to different steel grades. There are also specifications for the impact toughness test. Ensure that the mechanical properties of bends must be met, that is, the mechanical properties of bends and steel pipes used as raw materials must meet the requirements specified in the standards of steel pipes.
Post URL: https://www.landeepipefitting.com/the-analysis-of-cracks-in-high-pressure-bends.html
Landee is a professional industrial pipe fitting manufacturer and be well accepted by customers all over the world, we has been producing Pipe Fitting for a variety of applications since 1985. welcome to access our website: https://www.landeepipefitting.com.
Previous: Failure Analysis of the Cracking of Stainless Steel Tees in Industrial Pipelines (Part Two)
Next: Leakages of Pipe Caps of Hot-wall Tubes of Hydrogen Conversion Furnaces (Part One)
Next: Leakages of Pipe Caps of Hot-wall Tubes of Hydrogen Conversion Furnaces (Part One)
